|
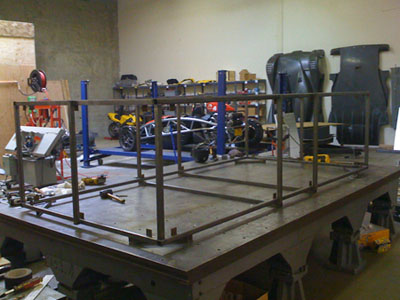
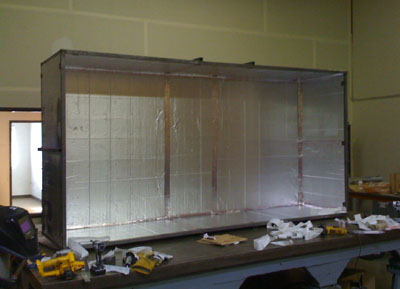
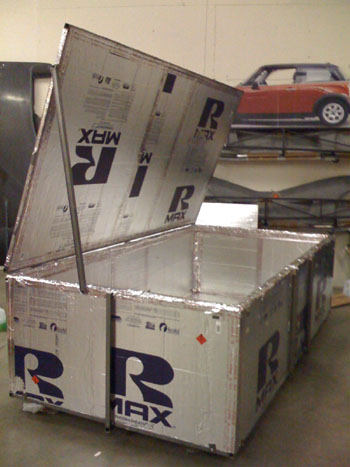
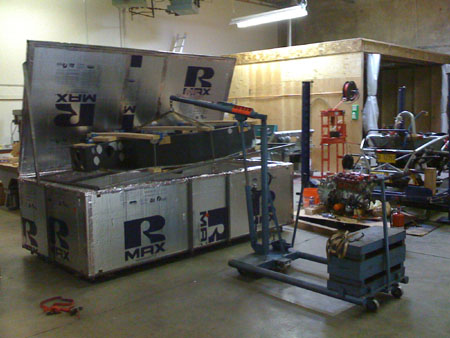
03/03/09 We're just about done building the oven for curing the chassis adhesive. The glue is a one-part heat cured epoxy and requires a 250F cure (it's shipped in dry ice, stored refrigerated and costs around $500/gallon). On Rod's suggestion we picked up some 1" Thermasheath aluminized foam board at Home Depot, which will essentially form the oven. To make it resonably robust we're building a frame out of 1" square tubing but the frame could just as easily be built out of 2x4s or anything else for that matter. I decided on a 5'x10'x2.5' size which will take just about any chassis we're likely to build. We can also expand it if need be with some pretty straightforward rework.
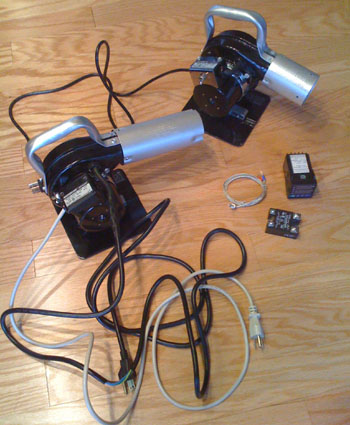
For heat I found a couple industrial continous-duty heatguns. These are made by Masterflow and come in various temperature ratings. I got a 300F one and a 750F one. The former will be used for hand-held spot-heating as needed and the latter will actually run the oven. I also picked up a small temperature controller on eBay and a 25A solid state relay. I'll post more details once I get everything working. Total cost is probably around $500-600 which isn't bad for an oven this size.
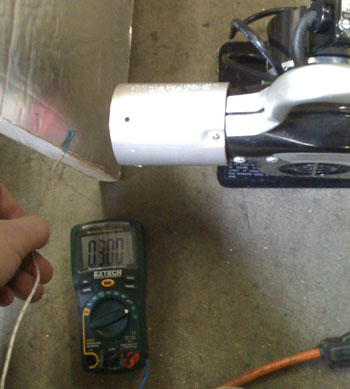
The bigger unit is the 750F and I've wired the fan to run continuously (it will recirculate air from the oven) while the heating element is run by the controller via the SSR. One thing I had to do is verify that the insulation will stand up to the 250F heat so I pointed the smaller heatgun at it for about 15 minutes. Seems to be working fine. And yes, the gun does in fact produce 300F.
While all this is going on (and much more) I figured I'd post a few more renderings just for fun. Yes I'm fond of black cars and dark backgrounds, what can I say... :) Click each for bigger version.
03/04/09 Oven is progressing well, all that's left is testing the heating and the control thereof. Tristan has done a great job building this thing while I've been doing design work on the cars and starting to take the Atom apart (watch for an update on that in a couple of days).
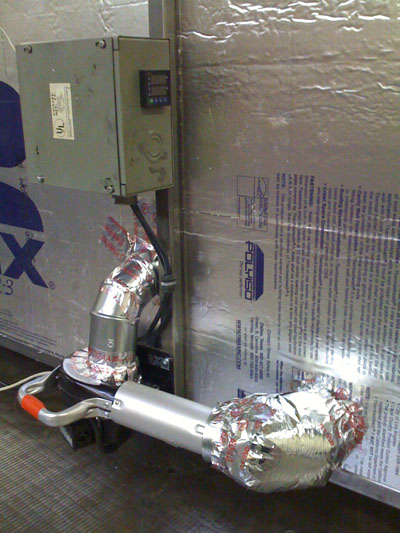
I went and looked up the foam material that the sheets are made of - Polyisocyanurate. Turns out the stuff is officially rated for service up to 225F but doesn't start degrading until over 750F. This should suffice for my needs. I suppose it would have been prudent to look it up in advance but my backup plan had been to add a layer of foil-surfaced fiberglass insulation if the foam itself didn't stand up to the heat. Guess that won't be necessary. The heat source is looking like this at the moment:
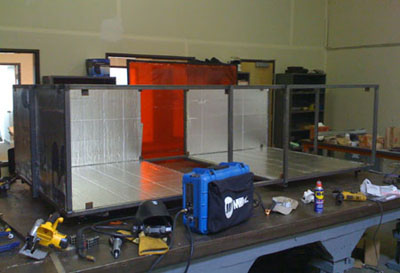
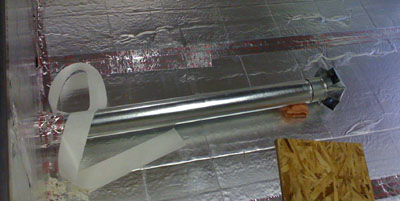
A layer of fiberglass insulation separates the duct from the foam. The temperature controller has all kinds of fancy PID parameters, self-learning algorithms, etc. Hopefully the setup will be fairly straightforward. I'm thinking that air circulation on the inside is going to be a big part of how well the thing works (several people have emailed me to say this, also) so my first cut at it is a duct that goes pretty much towards the middle of the oven and then has a cap that directs airflow in several directions. The chassis being heated will be propped up several inches above the duct and I'll probably pinch down the top vent a bit.
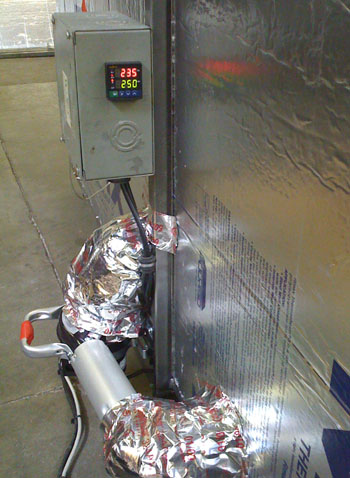
We've also added some 'ports' in the corners which are basically round holes that are normally plugged with insulation. We can use these to blow more hot air inside with the second, 300F heat gun for both faster heating and added circulation. 03/13/09 Got the oven running. It needs a bit more insulation. With the single (750F) heatgun running it gets up to 200F in about 10 minutes but then it takes it another hour to get to 235F where it stops. We need 250F. We do know what needs to be done though and it'll happen in the next couple of days. After which the chassis will get bonded together - fun!
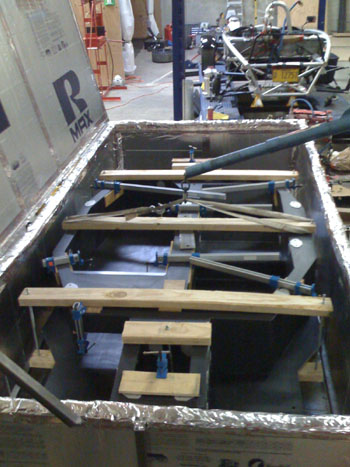
To shield the chassis from the direct hot air flow, elevate it above the ducting and generally support it, Tristan made a wooden structure with a sheetmetal shield. Should work pretty well.
Of course with the chassis inside the oven the airflow will change and it will probably take even longer to ramp up but that isn't necessarily bad. Slower heating will help ensure all the panels and seams are heated uniformly and thoroughly. It's a learning experience, all this :) 03/14/09 Lots of things happening at once (see also the Atom page). On the dp1 front, we added insulation and lid hinges to the oven...
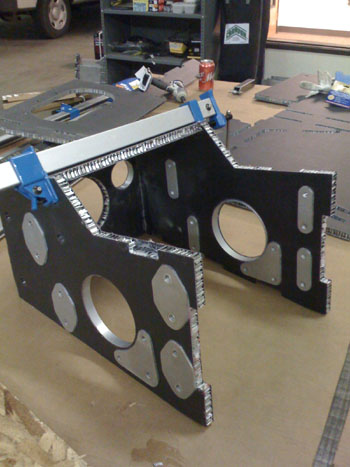
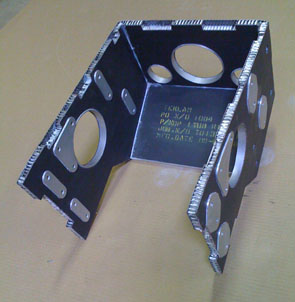
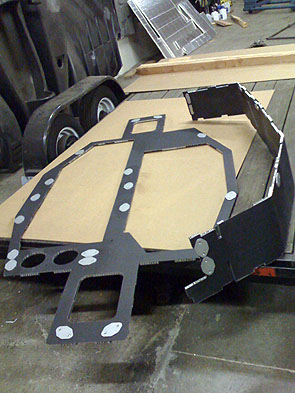
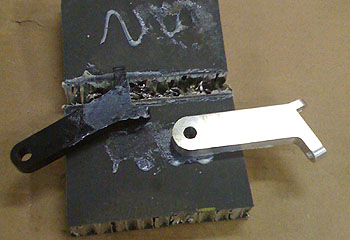
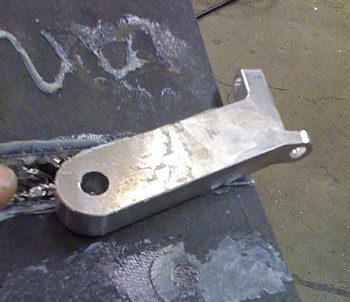
Next is the bonding of the chassis. First step is to install all the hardpoints in the panels. These are parts I designed and Jared made them on a CNC machine. The goal is to transfer loads to a wide patch of panel skin on both sides. In tension it pulls against the back skin, in compression it pushes on the front, and in shear both skins are at work. The holes are just locators.
Prior to installation the bonded surfaces are wire brushed, cleaned with MEK, then the panels themselves get a similar treatment, then heat-cure epoxy is dispensed onto the parts. They are installed in the panels and pressed into place. It's fairly labor-intensive. Some of the details and processes I'm going to keep to myself, both because they're experimental and because the things I learn are the foundation of the design and fabrication services we are offering. It is a bit of a balancing act, what to share and what to hold back. While a part of me wants to be as open as possible, these days I also have to keep in mind we're running a business here :) And of course there will be design changes going forward based on the experience I gain. Sometimes you just have to try things and see how it goes - the goal is always to improve. 03/18/09 We ran a test cure cycle of a couple parts - the end boxes. Seems to work OK. The adhesive is rated for service at up to 300F so hopefully a few repeated 250F cures won't have any detrimental effect on the stuff.
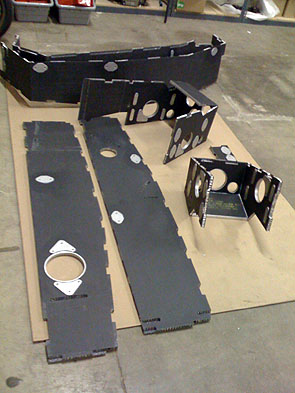
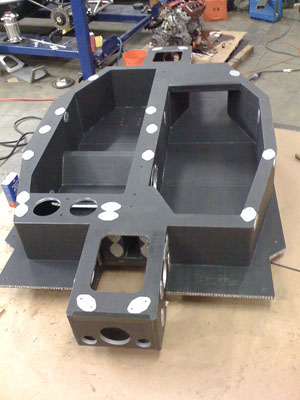
We now have all the hardpoints installed. There are lots of them. Tomorrow we put everything together and Friday the plan is to run a cure of the complete chassis. After that there will be some trim and reinforcement and we'll bake it again. The current design turns out to be quite labor-intensive so after this one is built there will be considerable redesign and refinement. Better manufacturability, serviceability and hopefully a bit lighter too.
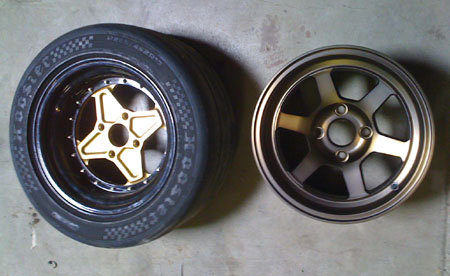
In other news I found a new wheel on the market - V2Competition 'drag wheel'. It is a Chinese-made copy of the Volk TE37 drag wheel, THE wheel that I always wanted to put on the dp1, from the start. Unfortunately the Volks are not generally available and it would take buying 50 of them at something upwards of $400 apiece to get the factory to make a batch. The new wheel is cast and not forged like the TE37 so it weighs 11 lbs instead of 8. That's still within half a pound of the custom 3-piece wheels that are on the prototype. But the wheels seem to be quite nicely made, are perfect dimension-wise, are readily available in a variety of colors and the price is right. The timing of this discovery is very convenient as well. Some things just work out. Hopefully.
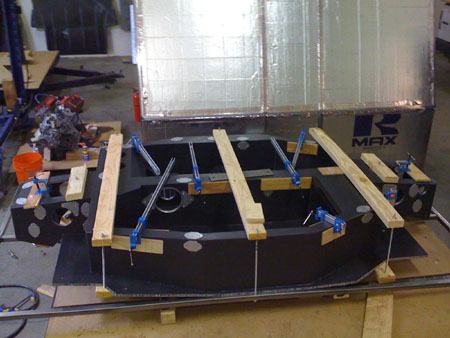
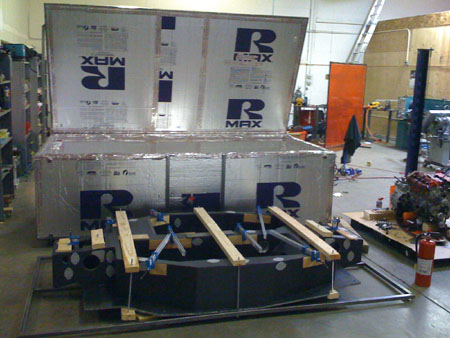
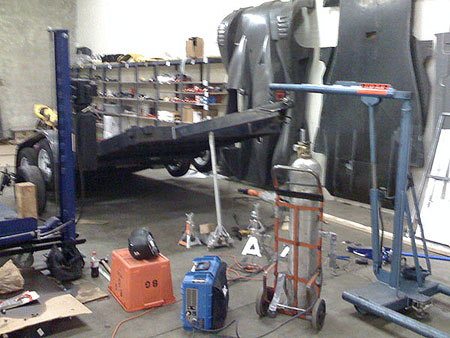
This is not final yet but most likely these will become the standard equipment on dp1 and dp4, and when enough cars are sold we may have a batch of TE37s made and offer them as an option. 03/20/09 There was actually a lot more to prepping the chassis for bonding and it took two full days. We made a frame that just fits in the oven and to which the chassis is attached. That worked out really well and the nifty crane/hoist that I got a while back has once again come in handy. The thing is awesome.
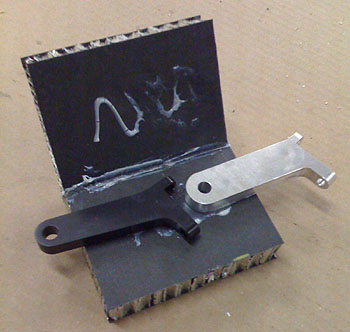
Since I want to bake the chassis for at least 5 hours and I don't want the oven running unattended I'll have to do it tomorrow. But it's all set. From the experience of putting this together I learned great many things and now I have a new/improved design in my head that will be simpler, lighter and possibly stronger. The concepts will be proven on the dp4 chassis first. It's a good thing I figured this out, I better get going on that one soon. The dp4 bodywork will be done in about 3 weeks... The goal is still to have both a v8 dp1 and a dp4 drivable sometime in June. Lots to do but things are coming together. For the Atom the target is mid-April. 03/22/09 I ran the first cure cycle and of course learned a few things. First, with the thermal mass of the chassis in the oven the single heatgun is not enough - temperature only got up to about 200F, despite running for 8 hours. As a result while most of the adhesive has hardened, some of it is still tacky. I tried using the second, smaller heatgun to help but it wasn't hooked up to recirculate the air and therefore didn't really do anything. It was suggested to me that a clothesdryer element might be more appropriate so I'm looking into that, as well as looking for a secont 750F heatgun. There are a couple on eBay. The next thing I learned is that any piece not fixed in place is likely to shift, even though they might be very light and attached so well by adhesive that they're hard to move by hand - I now have a little bit of rework to do on a reinforcement strip I added as a test. No big deal, reinforcements were really planned for the second cure cycle all along. As well as edge closeouts and such. As an experiment I put a test piece in the oven along with the chassis. I set it in the middle of the footwell, the area that would get the least circulation. The purpose was to have a worst-case sample. So I did absolutely no prep to the panel or the two pieces I attached to it, not even a wipedown with MEK. One aluminum piece is bare metal that's been sitting around for a while and so has a nice layer of oxide on it. The other piece is hard-anodized.
When I took it out of the oven some of the glue was still tacky - interestingly it was the portion that was spread thin. The thicker beads were all hardened. As an initial test I simply set the piece on two 2x4s and stood on it. All the bonds supported my weight (about 190 lbs) with no issues, including the angle seam.
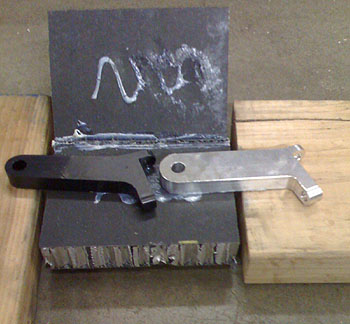
A slight bounce broke the angle first and a bit more effort broke off the anodized piece. Note that there was quite a bit of peel leverage on it and that the glue came off the uncleaned composite panel but adhered well to the anodize.
The second piece was harder to remove. I put it into my press in shear (i.e. the press trying to scrape the piece off the panel). According to the gage the force was about 400 lbs when it snapped off. Notice that in this case the adhesive stayed on the panel and separated from the unprepped aluminum.
So the results are encouraging overall. Throughout the chassis all the bond areas are much larger in size, much lower stress and prepped much better. Still, I will reinforce some of the more critical joints just to be safe. The test also suggests that anodized hardpoints are feasible, as long as there is mechanical backup to the joint and it's thoroughly cleaned prior to bonding. This would eliminate the wirebrushing step and save a lot of time and hassle. 03/26/09 There is a way of reinforcing the seams that I want to try and I've ordered the necessary supplies... Just waiting for them to show up. The chassis is looking reasonably complete even though a lot is still to be done on it.
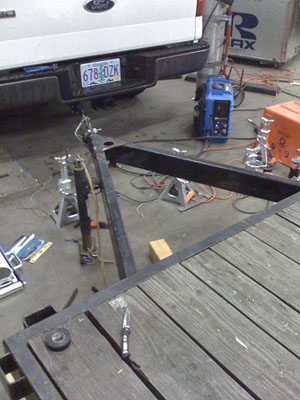
While waiting for stuff we are taking the opportunity to do things that have been on the list forever and a day. Like modifying the trailer. When it was first built, I requested the lowest possible deck height the builder could do. That they delivered, but they still built the rest of it the way they built their standard trailers, with the tow bar underslung beneath the main deck. It's a cheap and structurally sound way to do it. Unfortunately with the trailer being as low as it is this meant things dragging on every slight pavement irregularity. It also required a serious drop hitch - something we don't have for the Ford so the trailer ended up being tilted backwards quite a bit. Precarious for cargo and the tail would drag on EVERYTHING. We were actually going to do the trailer as the first project in the shop, to break in all the equipment. That didn't happen since cars are higher priority but two days ago we had a short break and instead of twiddling thumbs we got the trailer done.
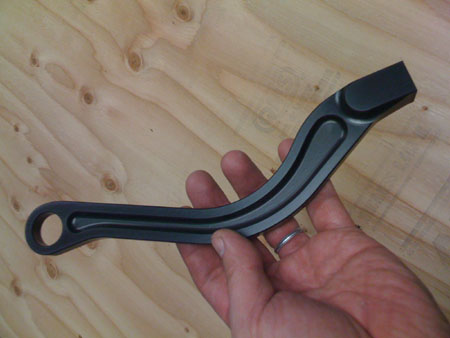
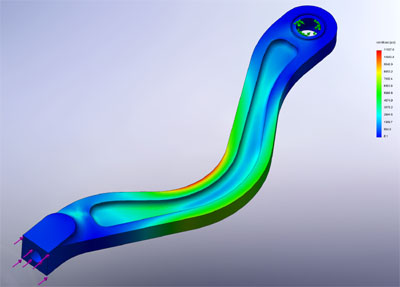
Tristan and Jared did a great job with it. Only took half a day or so (OK and a late evening). Done it is though and much better for it. Now we need something for it to transport. To the track, preferably. 04/15/09 Much attention has been directed to the Atom, dp4 and other endeavors lately but rest assured work continues on the dp1 as well. Parts have been arriving and more are being ordered. I finished up the design of the 28/72 torque splitter with the help of Michael Allison, an experienced mechanical engineer who has designed a number of gearboxes among other things. Then I ran some simulations and decided that overall a 34/66 torque split would work better. It's a tradeoff between ultimate off-the-line acceleration (28/72 is ideal for that) and more predictable behavior on corner exit where weight transfer is less pronounced. With the more extreme split the car would just spin exiting corners unless power was carefully modulated. The 34/66 split is far more forgiving in this situation and ultimately faster because of better drive out of turns. So I asked Michael to generate tooth profiles for that as well and now I'm finishing up the design. In the process I discovered for myself an interesting rule of thumb about planetary gearsets, something that wasn't obvious to me but I suspect is common knowledge to a few out there. And that is the fact that if you have sun and ring gears with relatively prime number of teeth, the number of possible planet positions is the sum of sun and ring gear counts. In other words, if you have a planetary set with a 15 tooth sun and 29 tooth ring, there are 44 possible valid planet positions so they can be located in 8.18 degree increments. This means that if I want 6 planets (which I do) they cannot be evenly spaced but have to be staggered slightly around the circle. I figured it out through experimentation and measurement in SolidWorks. I couldn't find any reference to this online but it probably exists. While design work continues, other parts are already here. The steering tie rod end turned out particularly neat. It's very light, too.
Only a short while ago it only existed in my head, then on the computer screen, now there's a bunch of real-metal parts on the shelf, all labeled with part numbers and tracked in inventory. Fun.
|